Vue.js Udemy 간단한 게임
유료강의를 듣고있기 때문에 소스를 전체 다 올리는건 안될것 같아서 제가 중요하다고 생각하는 부분만 설명하면서 기록하려고 합니다.
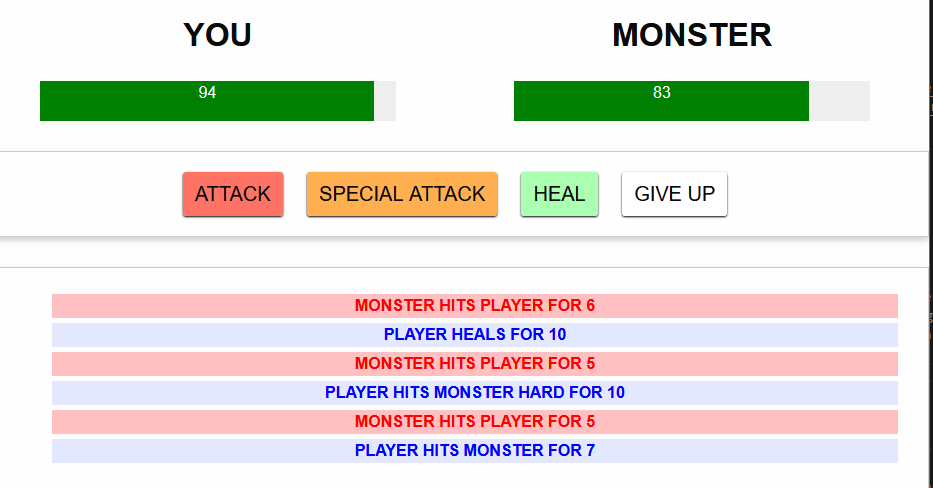
Monster Slayer라는 게임을 만듭니다.
 정말 간단한 게임입니다.
Attack을 누르면 서로 데미지가 들어갑니다.
Special Attack은 조금 더 강한 데미지가 들어갑니다.
Heal은 체력을 회복합니다.
Give Up은 기권하고 게임을 마칩니다.
플레이어와 몬스터의 체력
<div class="healthbar">
        <div class="healthbar text-center"
                style="background-color: green; margin: 0; color: white;"
                :style="{width: playerHealth + '%'}">

        </div>
</div>
<div class="healthbar">
       <div class="healthbar text-center"
                style="background-color: green; margin: 0; color: white;"
                :style="{width: monsterHealth + '%'}">

       </div>
</div>
<script>
    new Vue({
    	el: '#app',
    	data: {
            playerHealth: 100,
            monsterHealth: 100,
            gameIsRunning: false
        }
})
</script>
gameIsRunning은 게임이 진행 중인지 아닌지를 판단합니다.
이 변수를 이용해 게임을 멈추거나 실행하게 합니다.
게임 실행
<section class="row controls" v-if="!gameIsRunning">
    <div class="small-12 columns">
        <button id="start-game" @click="startGame">START NEW GAME</button>
    </div>
</section>
이제 게임을 실행 시키기 위해 startGame이라는 메소드를 생성해야 합니다.
methods: {
    startGame: function(){
        this.gameIsRunning = true
        this.playerHealth = 100
        this.monsterHealth = 100
    }
}
게임을 실행했기 때문에 this.gameIsRunning = true로 해주고 플레이어와 몬스터의 체력을100으로 초기화 시켜줍니다.
공격 기능
이제 하나씩 기능을 만들어야 합니다. 우선 공격부터 만들기 위해 데미지를 계산하는 메소드를 만듭니다.
methods: {
    calculateDamage: function(min, max){
        return Math.max(Math.floor(Math.random() * max) + 1, min)
    },
    monsterAttacks: function(){
        var damage = this.calculateDamage(5, 12)
        this.playerHealth -= damage
    },
    attack: function(){
        var damage = this.calculateDamage(3, 10)
        this.monsterHealth -= damage

        this.monsterAttacks()
    },
}
Math.random()은 0을 포함하면서 1보다는 작은 수를 무작위로 출력합니다.
거기에 max를 곱해 어느 정도 괜찮은 데미지가 들어가게 만듭니다.
0.99가 최대인 데미지 수치는 사용할 수 없으니까요.
Math.floor()를 이용해 소수점 이하를 버려 정수를 만들고 0인 데미지를 없애기 위해서 +1 합니다.
그리고 Math.max()를 통해 min부터 Math.floor(Math.random() * max) + 1로 사이의 최댓값을 출력합니다.
그래서 이 메소드를 이용해 monsterAttacks를 만듭니다.
몬스터가 플레이어를 공격하는 것이므로 this.playerHealth에서 damage를 빼주면 됩니다.
이제 attack 메소드를 만들고 플레이어가 공격했을때는 this.monsterHealth에서 damage를 빼줍니다.
this.monsterAttacks()를 사용해서 attack을 누르면 플레이어와 몬스터가 서로 공격하게 합니다.
<button id="attack" @click="attack">ATTACK</button>
<button id="special-attack" @click="specialAttack">SPECIAL ATTACK</button>
<button id="heal" @click="heal">HEAL</button>
<button id="give-up" @click="giveUp">GIVE UP</button>
버튼에 연결하고 누르면 체력이 변하는걸 확인할 수 있습니다.
이 상태에서 계속 attack을 하면 체력이 마이너스로 변하는걸 확인할 수 있습니다.
그러므로 체력이 0이하로 가면 누가 승리했는지 체크하는 메소드를 만들어야 합니다.
checkWin: function(){
        if (this.monsterHealth <= 0) {
            if (confirm('You won! New Game?')){
                this.startGame()
            } else {
                this.gameIsRunning = false
            }
            return true
        } else if (this.playerHealth <= 0){
            if (confirm('You lost! New Game?')){
                this.startGame()
            } else {
                this.gameIsRunning = false
            }
            return true
        }
        return false
    }
confirm은 Yes or No를 선택할 수 있는 창을 띄우는 기능입니다 . if와 함께 사용하면 Yes를 눌렀을때와 No를 눌렀을때의 명령을 넣을 수 있습니다. Yes를 눌렀을 때는 참이므로 this.startGame()으로 새로운 게임을 시작하고 No를 눌렀을 때는 새로운 게임을 원하지 않으므로 this.gameIsRunning = false로 해줍니다.
attack: function(){
        var damage = this.calculateDamage(3, 10)
        this.monsterHealth -= damage
        this.turns.unshift({
            isPlayer: true,
            text: 'Player hits Monster for '+ damage
        })
        if(this.checkWin()){
            return
        }
        this.monsterAttacks()
    },
monsterAttacks: function(){
        var damage = this.calculateDamage(5, 12)
        this.playerHealth -= damage
        this.checkWin()
        this.turns.unshift({
            isPlayer: false,
            text: 'Monster hits Player for '+ damage
        })
    },
specialAttack: function(){
        var damage = this.calculateDamage(10, 20)
        this.monsterHealth -= damage
        this.turns.unshift({
            isPlayer: true,
            text: 'Player hits Monster hard for '+ damage
        })
        if(this.checkWin()){
            return
        }
        this.monsterAttacks()
    },
위와 같이 수정을 해주면 공격을 하다가 체력이 0 이하가 됐을때 승리를 체크합니다.
heal, giveUp도 비슷한 원리로 만들면 됩니다.
heal: function(){
        if(this.playerHelath <= 90){
            this.playerHealth += 10
        } else {
            this.playerHealth = 100
        }
        this.turns.unshift({
            isPlayer: true,
            text: 'Player heals for 10'
        })
        this.monsterAttacks()
    },
giveUp: function(){
        this.gameIsRunning = false
        if(confirm('You lost! New Game?')){
            this.startGame()
        } else {
            this.gameIsRunning = false
        }
    },
이제 누가 공격하고 얼마나 데미지를 입었는지 log를 띄워봅시다.
data: {
    turns: []
}
data에 turns라는 비어있는 배열을 추가합니다.
그리고 공격을 하거나 회복을 할때마다 this.turns.unshift()를 이용해 배열 앞에 값을 추가해줍니다.
push()를 사용하면 뒤에 값을 추가합니다.
값을 앞에 추가해야 하는 이유는 그래야지 최근 공격한 log가 제일 위에 뜨기 때문입니다.
push()를 이용해서 log를 띄우면 최근 공격한 log가 계속 뒤로 넘어가고 오래된 log가 가장 상단에 있어서 디자인적으로 맞지 않습니다.
<section class="row log" v-if="turns.length > 0">
    <div class="small-12 columns">
        <ul>
            <li v-for="turn in turns"
            :class="{'player-turn': turn.isPlayer, 'monster-turn': !turn.isPlayer}">

            </li>
        </ul>
    </div>
</section>
v-if=turns.length > 0을 넣어줘서 section이 turns에 값이 있을 경우에만 표시되게 하여 디자인적으로 깔끔하게 해줍니다.
:class="{'player-turn': turn.isPlayer, 'monster-turn': !turn.isPlayer}"
.log ul .player-turn {
    color: blue;
    background-color: #e4e8ff;
}

.log ul .monster-turn {
    color: red;
    background-color: #ffc0c1;
}
:class로 css에 있는 .player-turn을 turn.isPlayer일때 효과를 연결하고 .monster-turn을 !turn.isPlayer일때 효과를 뜨게 한다. 그래서 플레이어가 공격할 때는 파란색 그렇지 않으면 빨간색으로 표시되게 한다.
소스 코드를 전체를 다 올리지 못하다 보니 분명 레이아웃은 원래만큼 안나오겠지만 우선 기능만 구현해봐도 많은 공부가 된다고 생각한다. 소스 자체가 어려운건 아닌데 역시 설명하는게 쉬운건 아니다…